how to change highlight color in library window
In Firefox 66.0.3 the highlight in the library window is too light to see. By this I mean the highlight color when the library window is not active. I use the library window to navigate the many bookmarks. When I click on an entry it highlights as a dark shade of blue. When I double click on the entry the website opens in the main Firefox window. Used to be the entry in the library window would show as grey when the main window is active. But after upgrading to the new release the the grey shade is so light the I can't see it unless I make the library window active. Is there a way to change inactive highlight to a darker shade of a different color?
Kaikki vastaukset (3)
There is a way, but it's a little bit of work.
Each Firefox theme has pairs of text and background colors that are applied to different parts of the interface. Firefox doesn't provide direct direct access to redefining those, but you can override them using an optional userChrome.css file with style rules directed toward the areas you care about. Because the lists in the Library window use especially old and funky code, it's tricky to style them, but I gave it a try and here's what I came up with.
Each "row" can be selected or selected + focused. The selected + focused is highly visible, but selected and not focused is, as you point out, very subtle.

In Firefox's built-in style sheet for this dialog, it has some placeholders for those colors, which I think is how they are adapted to different themes:
treechildren::-moz-tree-row(selected) {
  background-color: -moz-cellhighlight;
}

treechildren::-moz-tree-row(selected, focus) {
  background-color: Highlight;
}
Since there needs to be a good contrast between the background color and the text, Firefox also has corresponding rules for the text color for the different items that can appear in the row:
treechildren::-moz-tree-image(selected),
treechildren::-moz-tree-twisty(selected),
treechildren::-moz-tree-cell-text(selected) {
  color: -moz-cellhighlighttext;
}

treechildren::-moz-tree-image(selected, focus),
treechildren::-moz-tree-twisty(selected, focus),
treechildren::-moz-tree-cell-text(selected, focus) {
  color: HighlightText;
}
I think as a first approximation, what you might do is make selected but not focused look the same as selected + focused and see whether you like that. (If not, you could change the Highlight and HighlightText keywords to actual colors.) Ready?
When you have 10 minutes, here's how:
This assumes you do not already have a userChrome.css file. If you do already have a working userChrome.css file, you just need to add the rules under (A) to your file.
(A) Select and copy the following style rule code
/* Library window: Give selected rows
   full highlight even if not focused */
window#places treechildren::-moz-tree-row(selected) {
  background-color: Highlight !important;
}
window#places treechildren::-moz-tree-image(selected),
window#places treechildren::-moz-tree-twisty(selected),
window#places treechildren::-moz-tree-cell-text(selected) {
  color: HighlightText !important;;
}
(B) Generate and download a userChrome.css file
Open the following page and paste the above rules into the editor, replacing the sample rule:
https://www.userchrome.org/download-userchrome-css.html
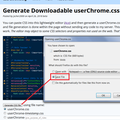
Then click "Generate CSS File" and save the userChrome.css file to your computer. (See second attached screenshot)
Use the downloads list on the toolbar to open the downloads folder directly to the new userChrome.css file. (See third attached screenshot)
Minimize (don't close) that Windows Explorer window for later reference.
(C) Create a new chrome folder in your profile folder
The following article has the detailed steps for that (#1, #2, and I recommend #3)
https://www.userchrome.org/how-create-userchrome-css.html
I have videos for both Windows and Mac in case the text is not clear.
(D) Move the userChrome.css file you generated in Step B into the chrome folder you created in Step C
The next time you exit Firefox and start it up again, it should discover that file and apply the rules to the Library window.
Success?
Muokattu
Sorry, copy/paste error on the above. I had to change userContent.css to userChrome.css throughout. Please ignore the original version.
Thank you, that worked great.


